
What is Rembrandt lighting?
You must be aware of your needs, but lighting setup isn’t expensive. In fact, what if we told you that you will need only one light source to create a focal point?

“Rembrandt lighting” is a type of lighting setup that artists use to enhance the dramatic effect in their art. Artists purposefully create light triangles on the subject’s face by using different light angles. Such an effect is super useful because they manage to create a more natural portrait look compared to other lighting setups. This approach is also called the “Rembrandt patch”, and it uses one, or sometimes two light sources to light the subject in question.
This technique was introduced by the Dutch painter Rembrandt Harmenszoon van Rijn. Since then, it has been widely accepted in cinematography, before being completely absorbed by photographers. The technique works in all scenarios and every photography style.

Modeling of subjects with the Chiaroscuro technique
Although popularized by Rembrandt, similar manners were frequently used in the past. The most famous polymath of all time, Leonardo da Vinci, used the “chiaroscuro” technique to achieve a similar effect in his paintings.
Chiaroscuro is an abstract idea of lighting, rather than a factual representation of light. Chiaroscuro uses clear tonal contrast implementation which is applied across an entire composition spectrum. This method is the best way to enhance the dramatic effect in paintings. This way, artists create an illusion of three-dimensional space on a two-dimensional canvas. Chiaroscuro is the perfect method for creating contrast between the background and the subject – very similar to Rembrandt’s technique.
How to position a one-light setup?
We will discuss the best way to set up our light source in order to capture the subject’s focal point. We must use all of the methods at our disposal to create an impactful and meaningful portrait. All of the factors mentioned above will have an impact on our viewers.
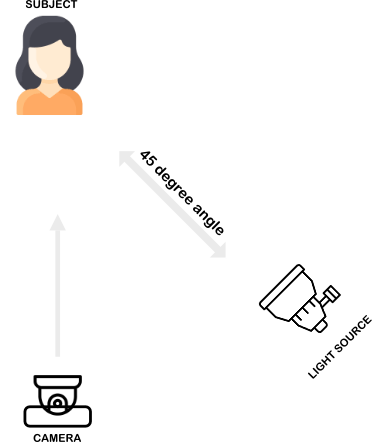
How to achieve a perfect angle?
Rembrandt patch is created when the light source is pointed at a 45-degree angle, slightly higher than a subject’s eye level. When we position the light in front of the subject, we are creating deep shadows with a triangular spotlight on the opposite side of the subject’s face. This effect will give us a focal point by adding more contrast.
That being said, determining a perfect focal point is a challenge. Many inexpensive wall art images found online, suffer from wrong lighting setup. Some of them have proper exposure levels, but overall, they lack drama and excitement. We often prove that inexpensive wall art must have good lighting.

How to choose the perfect one-light setup location?
It really doesn’t matter if you are shooting indoors or outdoors. The Rembrandt technique can be used in any setting or time of day.
If you are shooting indoors, all you need is one inexpensive light source. In fact, the best effect is often achieved using natural sunlight from the window’s direction. You may notice that almost all of our chess wall art is created using natural light. However, there are instances where we use secondary light sources positioned from behind the subject. This helps us emphasize the main character in our images.

Best aperture settings
A shallow aperture (f1.8 – f3.5) is a great option for portraits. It can provide a narrow depth of field and a softer look. When you use a shallow aperture, the subject should be positioned between the camera and the background.
On the other hand, a narrow aperture (f8 – f16) is often used in landscape photography. It helps to capture a lot of details in the image but can also create sharper edges in the background.
Most of the time, we are using shallow apertures.
Conclusion
The Rembrandt triangle effect is the perfect lighting solution. Experiment and find what works best for you. After all, you are working with the tools you have at our disposal. Whatever you do, don’t fall into a trap of “proper” lighting setup theory.
Person icons created by Vitaly Gorbachev – Flaticon
Ip camera icons created by SumberRejeki – Flaticon
Reflector icons created by Yogi Aprelliyanto – Flaticon
Side view icons created by Pixelmeetup – Flaticon